Documenting the API in OAS 3.0
The Open API Specification (OAS 3.0), a follow-on to Swagger 2.0 which merges in many of the modeling features of RAML 1.0, allows us to model and document our APIs in a machine- and human-readable format. See the following example. OAS 3.0 has become the standard machine-readable representation of API schemas.
DRF has begun adding OAS 3.0 support and will likely need some DJA enhancements before it is ready to automate generating a schema document. But it looks like the ability to generate at least a rudimentary OAS schema starting from Models, Views and Serializers may soone be a relaity.
Why an OAS 3.0 Schema?
Having a standardized schema document enables API consumer and producer developers to formally agree on the API details in an automated way, providing tools for developers to perform basic data input validation and to provide developer documentation and the familiar swagger “Try it!” functionality.
 Swagger UI
Experiments with OpenAPI Schema documentation, validation and mocking tools
While “waiting” on automated OAS schema generation, I’ve been experimenting with manually coding a schema to get a feeling for the value of eventually having automated schema generation.
Automatic Schema Generation
NEW!
I’ve prototyped automatic openapi schema generation and expect to submit a PR to the DJA project to adopt it soon. To generate a YAML schema document:
./manage.py generateschema >openapi.yaml
If you want a JSON schema document:
./manage.py generateschema --format openapi-json >openapi.json
I’ve added a few commands to tox.ini to generate a schema or update the docker image with it, respectively:
[testenv:openapi]
deps =
     -rrequirements.txt
setenv =
    DJANGO_SETTINGS_MODULE = training.settings
commands =
    /bin/sh -c "python manage.py generateschema --format openapi-json >docs/schemas/openapi.json"

[testenv:docker]
deps =
     -rrequirements.txt
whitelist_externals =
    docker
setenv =
    DJANGO_SETTINGS_MODULE = training.settings
commands =
    /bin/sh -c "python manage.py generateschema --format openapi-json >docs/schemas/openapi.json"
    /bin/cp docs/schemas/openapi.json myapp/static/openapi/myapp.json
    /bin/rm -rf dist
    python setup.py bdist_wheel
    docker build -t myapp:latest .
    docker image save -o myapp-docker.tar myapp:latest
Composing the OAS Schema with external references.
To make things DRYer, the OAS schema can be decomposed into shareable pieces that are referenced via the $ref tag.
These can be files in the same directory as the schema file or reachable via http references. For example,
replace "$ref": "#/components/schemas/CourseAttributes" with
"$ref": "Course.json#/definitions/CourseAttributes" or
"$ref": "http://www.columbia.edu/~alan/schemas/sas/Course.json#/definitions/CourseAttributes".
The jsonapi OAS schema
This jsonapi schema include file
is referenced by myapp.yaml and contains the {json:api} common definitions that myapp references.
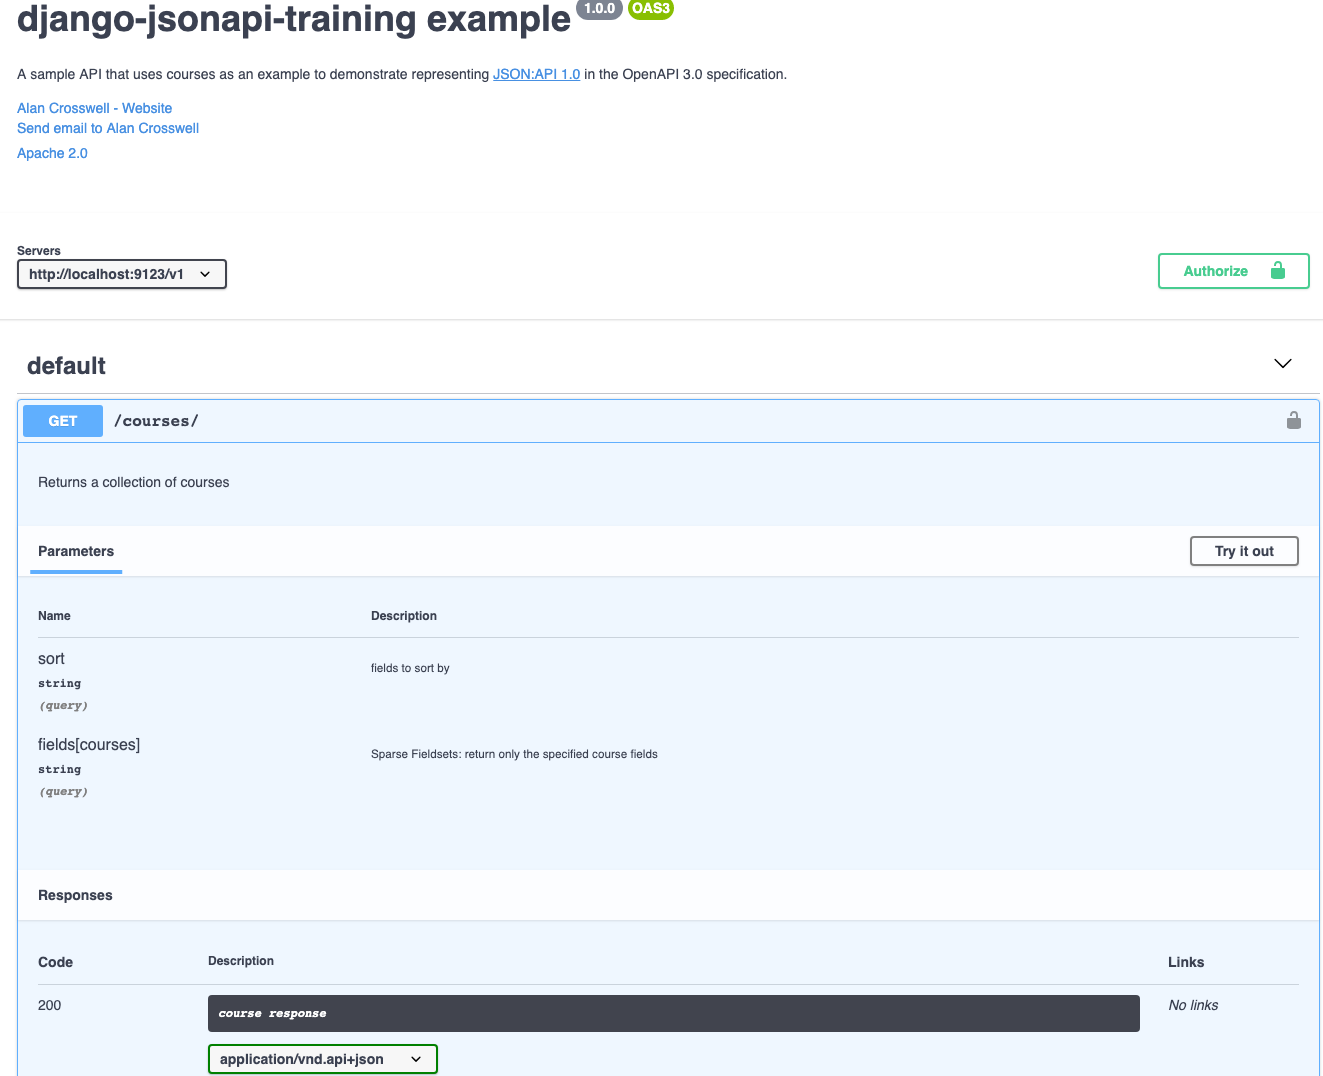
Myapp’s OAS 3.0 schema with swagger Try It functionality
This hand-written schema actually works and allows “Try It!” functionality with the following caveats:
Change the API port to 9123 in PyCharm since the default port for swagger-ui-watcher is 8000.
OAuth2 clients need to be configured that include these request_uris:
http://127.0.0.1/oauth2-redirect.html
http://localhost/oauth2-redirect.html
Both Basic Auth and OAuth2 logins are supported.
See docs/schemas/myapp.yaml
Here are some abbreviated snippets of myapp.yaml:
openapi: 3.0.2
info:
  version: 1.0.0
  title: 'django-jsonapi-training example'
  description: >-
    A sample API that uses courses as an example to demonstrate representing
    [JSON:API 1.0](http://jsonapi.org/format) in the OpenAPI 3.0 specification.
  contact:
    name: Alan Crosswell
    email: alan@columbia.edu
    url: 'http://www.columbia.edu/~alan'
  license:
    name: Apache 2.0
    url: 'https://www.apache.org/licenses/LICENSE-2.0.html'
servers:
  - url: 'http://localhost:9123/v1'
paths:
  /courses/:
    get:
      description: Returns a collection of courses
      operationId: find courses
      security:
        - basicAuth: []
        - oauth-dev: [auth-columbia, read]
      responses:
        '200':
          description: course response
          content:
            application/vnd.api+json:
              schema:
                $ref: '#/components/schemas/CourseCollection'
components:
  securitySchemes:
    basicAuth:
      type: http
      scheme: basic
    oauth-dev:
      type: oauth2
      flows:
        authorizationCode:
          authorizationUrl: https://oauth-dev.cuit.columbia.edu:8443/as/authorization.oauth2
          tokenUrl: https://oauth-dev.cuit.columbia.edu:8443/as/token.oauth2
          scopes:
            "auth-columbia": Columbia UNI login
            create: create
            read: read
            update: update
            delete: delete
            openid: disclose your identity
            profile: your user profile
            email: your email address
            "https://api.columbia.edu/scope/group": groups you are a member of
            "demo-netphone-admin": Administrative access to netphone resources
  schemas:
  # ...
    CourseCollection:
      type: array
      items:
        $ref: '#/components/schemas/CourseItem'
    CourseItem:
      allOf:
        - $ref: 'http://www.columbia.edu/~alan/schemas/common/jsonapi.yaml#/components/schemas/resource'
        - type: object
          properties:
            attributes:
              $ref: '#/components/schemas/CourseSchema'
            relationships:
              $ref: '#/components/schemas/CourseRelationships'
swagger-editor
Swagger-editor installs as a docker container and then runs an in-browser schema editor. It’s main failings are:
the editor stores files in the container so you have to explicitly export files to the local filesystem.
it does not follow network
$refs (e.g. tohttp://www.columbia.edu/~alan/schemas/sas/Course.json)
swagger-ui-watcher
Swagger-ui-watcher lets you edit the API definition in your favorite text editor and updates the browser view
dynamically as the file changes. Otherwise it looks just like swagger-editor. It also properly follows
$ref network URIs.
To run it:
npm install swagger-ui-watcher -g then swagger-ui-watcher ./openapi.yaml
You can use swagger-ui-watcher to “bundle” you app’s OAS schema with the external schemas that it
references. The bundled output file is always a JSON document.
schemas$ swagger-ui-watcher -b myapp.json myapp.yaml
Schema validation with apistar
While the swagger-ui packages will validate a schema, with error messages popping up in the browser window, you can also do command-line OAS schema validation with a number of tools. A cool new one is apistar:
docs$ pip install apistar
docs$ apistar validate  --path schemas/myapp.json --format openapi
✓ Valid OpenAPI schema.
Working around a missing oauth2-redirect.html in swagger-editor and swagger-ui-watcher
The swagger-editor distribution package (and therefore swagger-ui-watcher as well) currently fails to finish a proper OAuth2 login because a 404 not found happens for a missing /oauth2-redirect.html.
swagger-ui-watcher
The (hopefully temporary) workaround for swagger-ui-watcher is to grab a copy of oauth2-redirect.html and:
cp oauth2-redirect.html /usr/local/lib/node_modules/swagger-ui-watcher/node_modules/swagger-editor-dist/
swagger-editor docker
swagger-editor$ docker exec -it heuristic_mirzakhani sh
/ # cd /usr/share/nginx/html/
/usr/share/nginx/html # # I had a copy already salted away ...
/usr/share/nginx/html # mv oauth2-redirect.htmlx oauth2-redirect.html
/usr/share/nginx/html # exit
swagger-editor$ docker restart heuristic_mirzakhani
heuristic_mirzakhani
Some issues I have with OAS 3.0
It’s not a DRY as I want it to be:
$refcan’t generally be used to set some values and then extend them.There are no parameterized macros like in RAML.
As such, OAS 3.0 is more suited as a machine-generated file format than something a human should be expected to compose for any kind of sophisticated API framework like {json:api}. To get any kind of reuse out of an OAS document, it will need to be pre-processed with something like m4 to basically add parameter substitutions.
There are proposed improvements in OAS 3.1 that may fix this in the future.
Adding the Swagger UI to my app
See this article which outlines the steps to add Swagger UI at the /v1/openapi path.
A bunch of new files are added in myapp/static/ and myapp/templates/ to add the Swagger-UI code
and myapp.json which was bundled above.
(env) django-training$ tree myapp/static/
myapp/static/
├── oauth2-redirect.html
└── openapi
    ├── myapp.json
    └── swagger-dist-ui
        ├── favicon-16x16.png
        ├── favicon-32x32.png
        ├── oauth2-redirect.html
        ├── swagger-ui-bundle.js
        ├── swagger-ui-bundle.js.map
        ├── swagger-ui-standalone-preset.js
        ├── swagger-ui-standalone-preset.js.map
        ├── swagger-ui.css
        ├── swagger-ui.css.map
        ├── swagger-ui.js
        └── swagger-ui.js.map

2 directories, 13 files

(env) django-training$ tree myapp/templates/
myapp/templates/
└── index.html
You have to edit index.html to add the static templating ({stuff in brackets}) and the filename
for our app’s OAS 3.0 spec:
...
    window.onload = function() {
      // Begin Swagger UI call region
      const ui = SwaggerUIBundle({
        url: "{% static "openapi/myapp.json" %}",
        dom_id: '#swagger-ui',
        deepLinking: true,
...
Add a STATIC_ROOT to settings which tells manage.py collectstatic where to put them:
 STATIC_URL = '/static/'
+STATIC_ROOT = '/var/www/html'
Also add some urlpattern changes in urls.py to bring in the templated index.html added above as well
as special-handling of /oauth2-redirect.html which wants to be top-level rather than below
the STATIC_URL.
+from django.contrib.staticfiles.views import serve
+from django.views.generic.base import RedirectView, TemplateView
@@ -73,6 +74,10 @@ urlpatterns = [
+    # swagger UI
+    path('v1/openapi/', TemplateView.as_view(template_name="index.html")),
+    # The default request_uri is /oauth2-redirect.html (no /static prefix) so just pass it into staticfiles serve():
+    path('oauth2-redirect.html', serve, {'path': 'oauth2-redirect.html'}),
We also have to update setup.py to package the required static and template files by adding a MANIFEST.in:
recursive-include myapp/static *
recursive-include myapp/templates *
After doing this, open /v1/openapi in a browser and you should get the Swagger-UI.
Note that our OAuth2 client will need to have registered the appropriate redirect_uri.
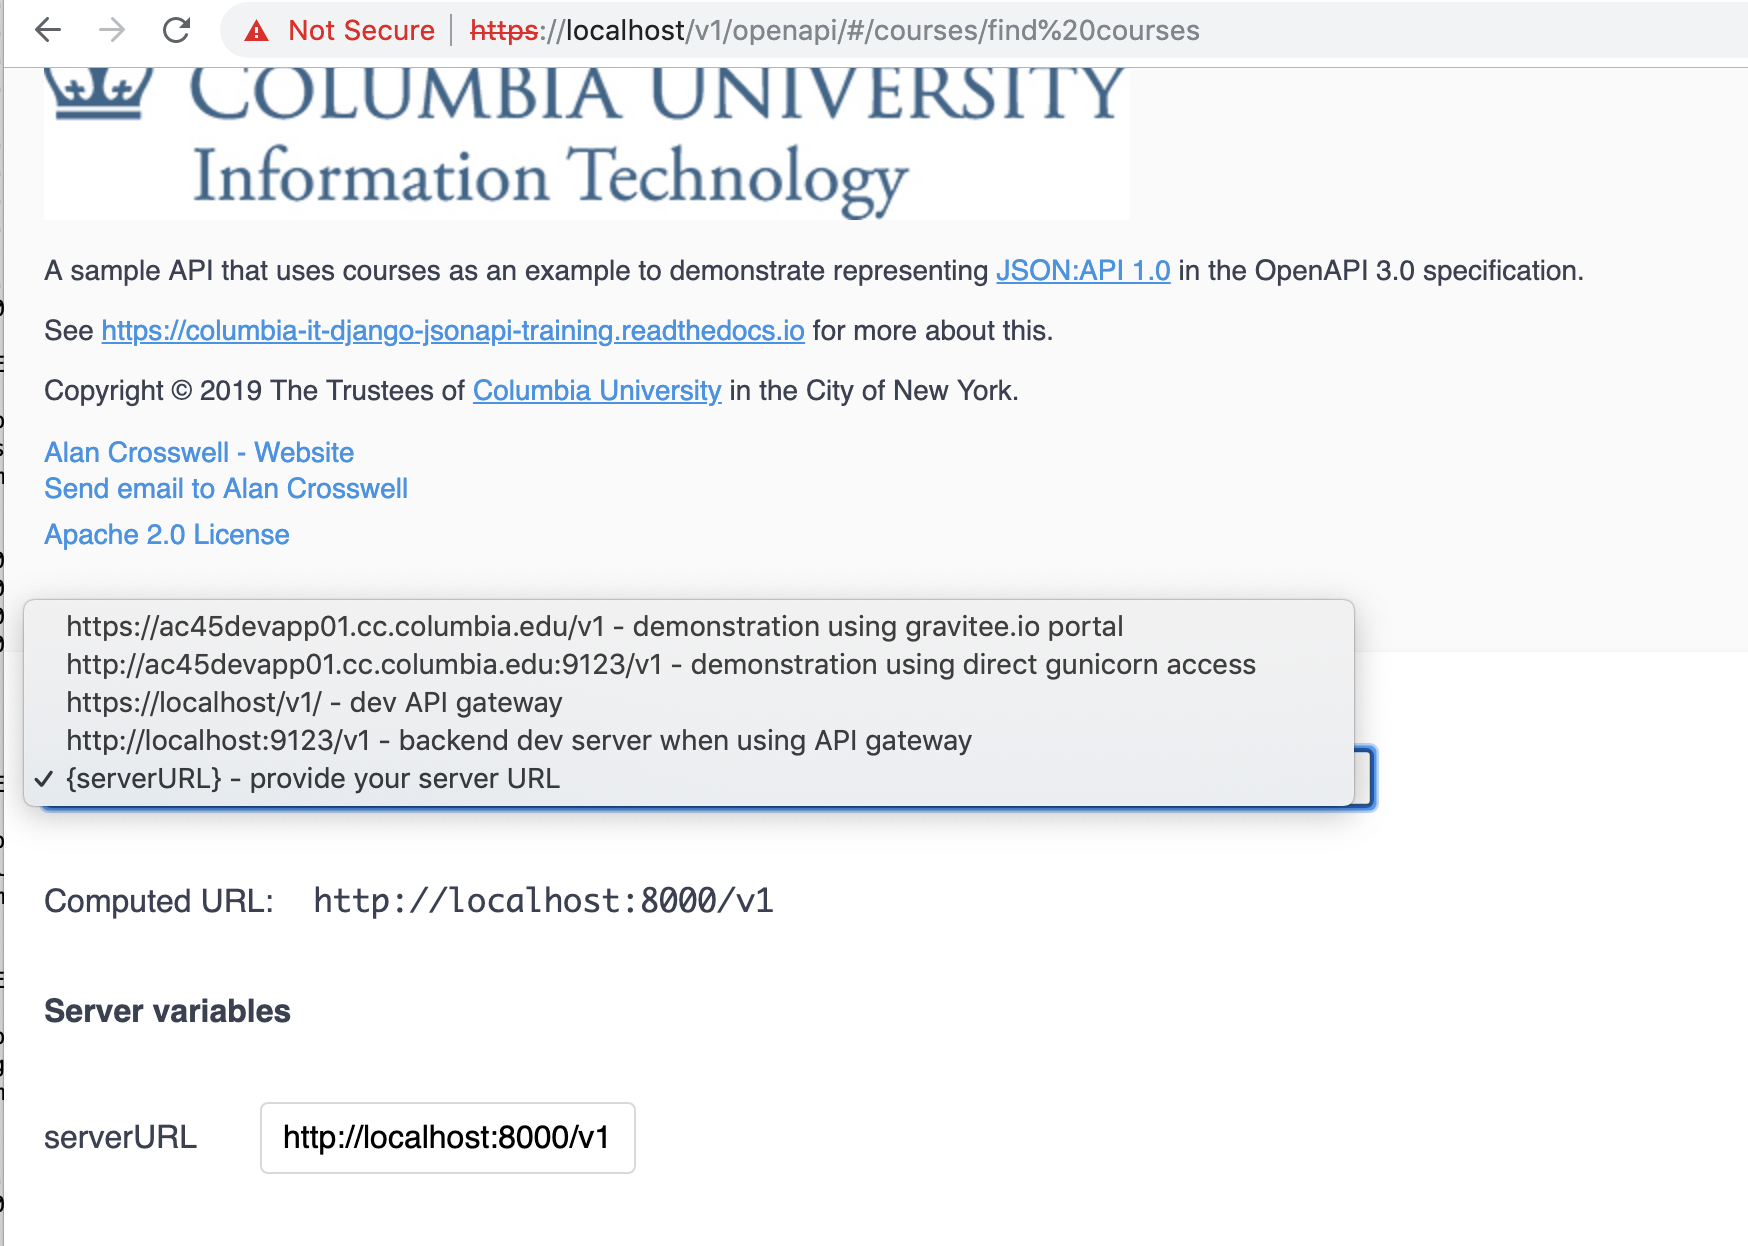
Selecting the correct Server in Swagger-UI
N.B. Make sure that when you use the Swagger-UI that you select the correct server from the Servers list at the top
as I’ve added several in myapp.yaml.
When running under PyCharm or runserver, choose {serverURL} - provider your server URL and use the default
of http://localhost:8000/v1. Also make sure when authenticating to use the same OAuth2 server that is being
introspected (OAUTH2_SERVER environment variable).
When running the docker-compose configuration (described in the next section),
use https://localhost/v1/ - dev API gateway.
As you can see, this Swagger-UI document has no real connection with your backend server; It’s just convenient to hang it off your server, especially when developing.
 Swagger UI